Product Instructions
How to adjust, orient, and use your INDX stabilizer


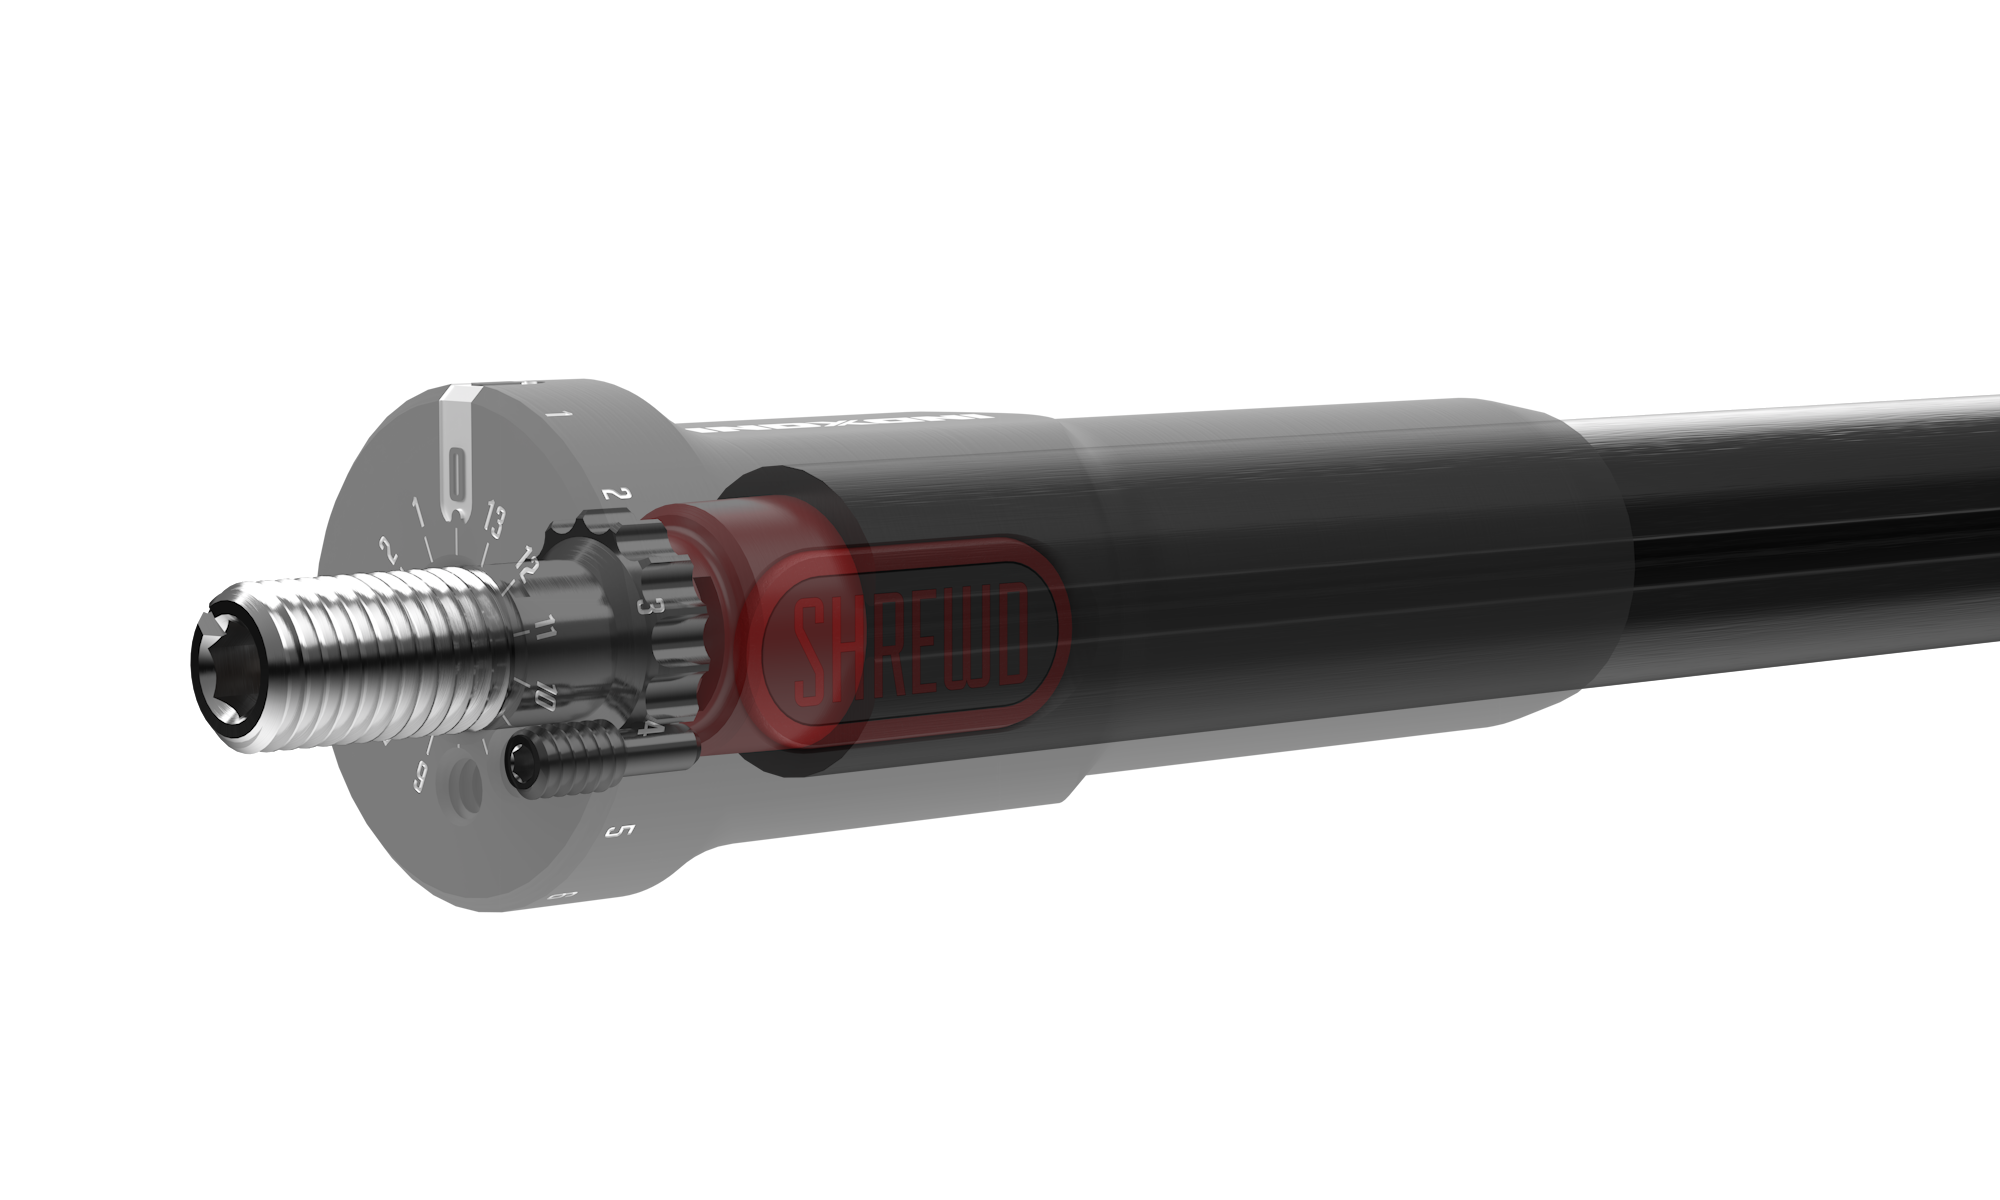
BEAM Carbon
Standard modulus carbon designed with a structural profile and constructed with continues fibers aligned longitudinal for maximum strength and dampening.
Mass Damper System
Tungsten weights suspended around the threaded rod of the weight stack absorb excess vibration and decouple the weight mass from the stabilizer movement.
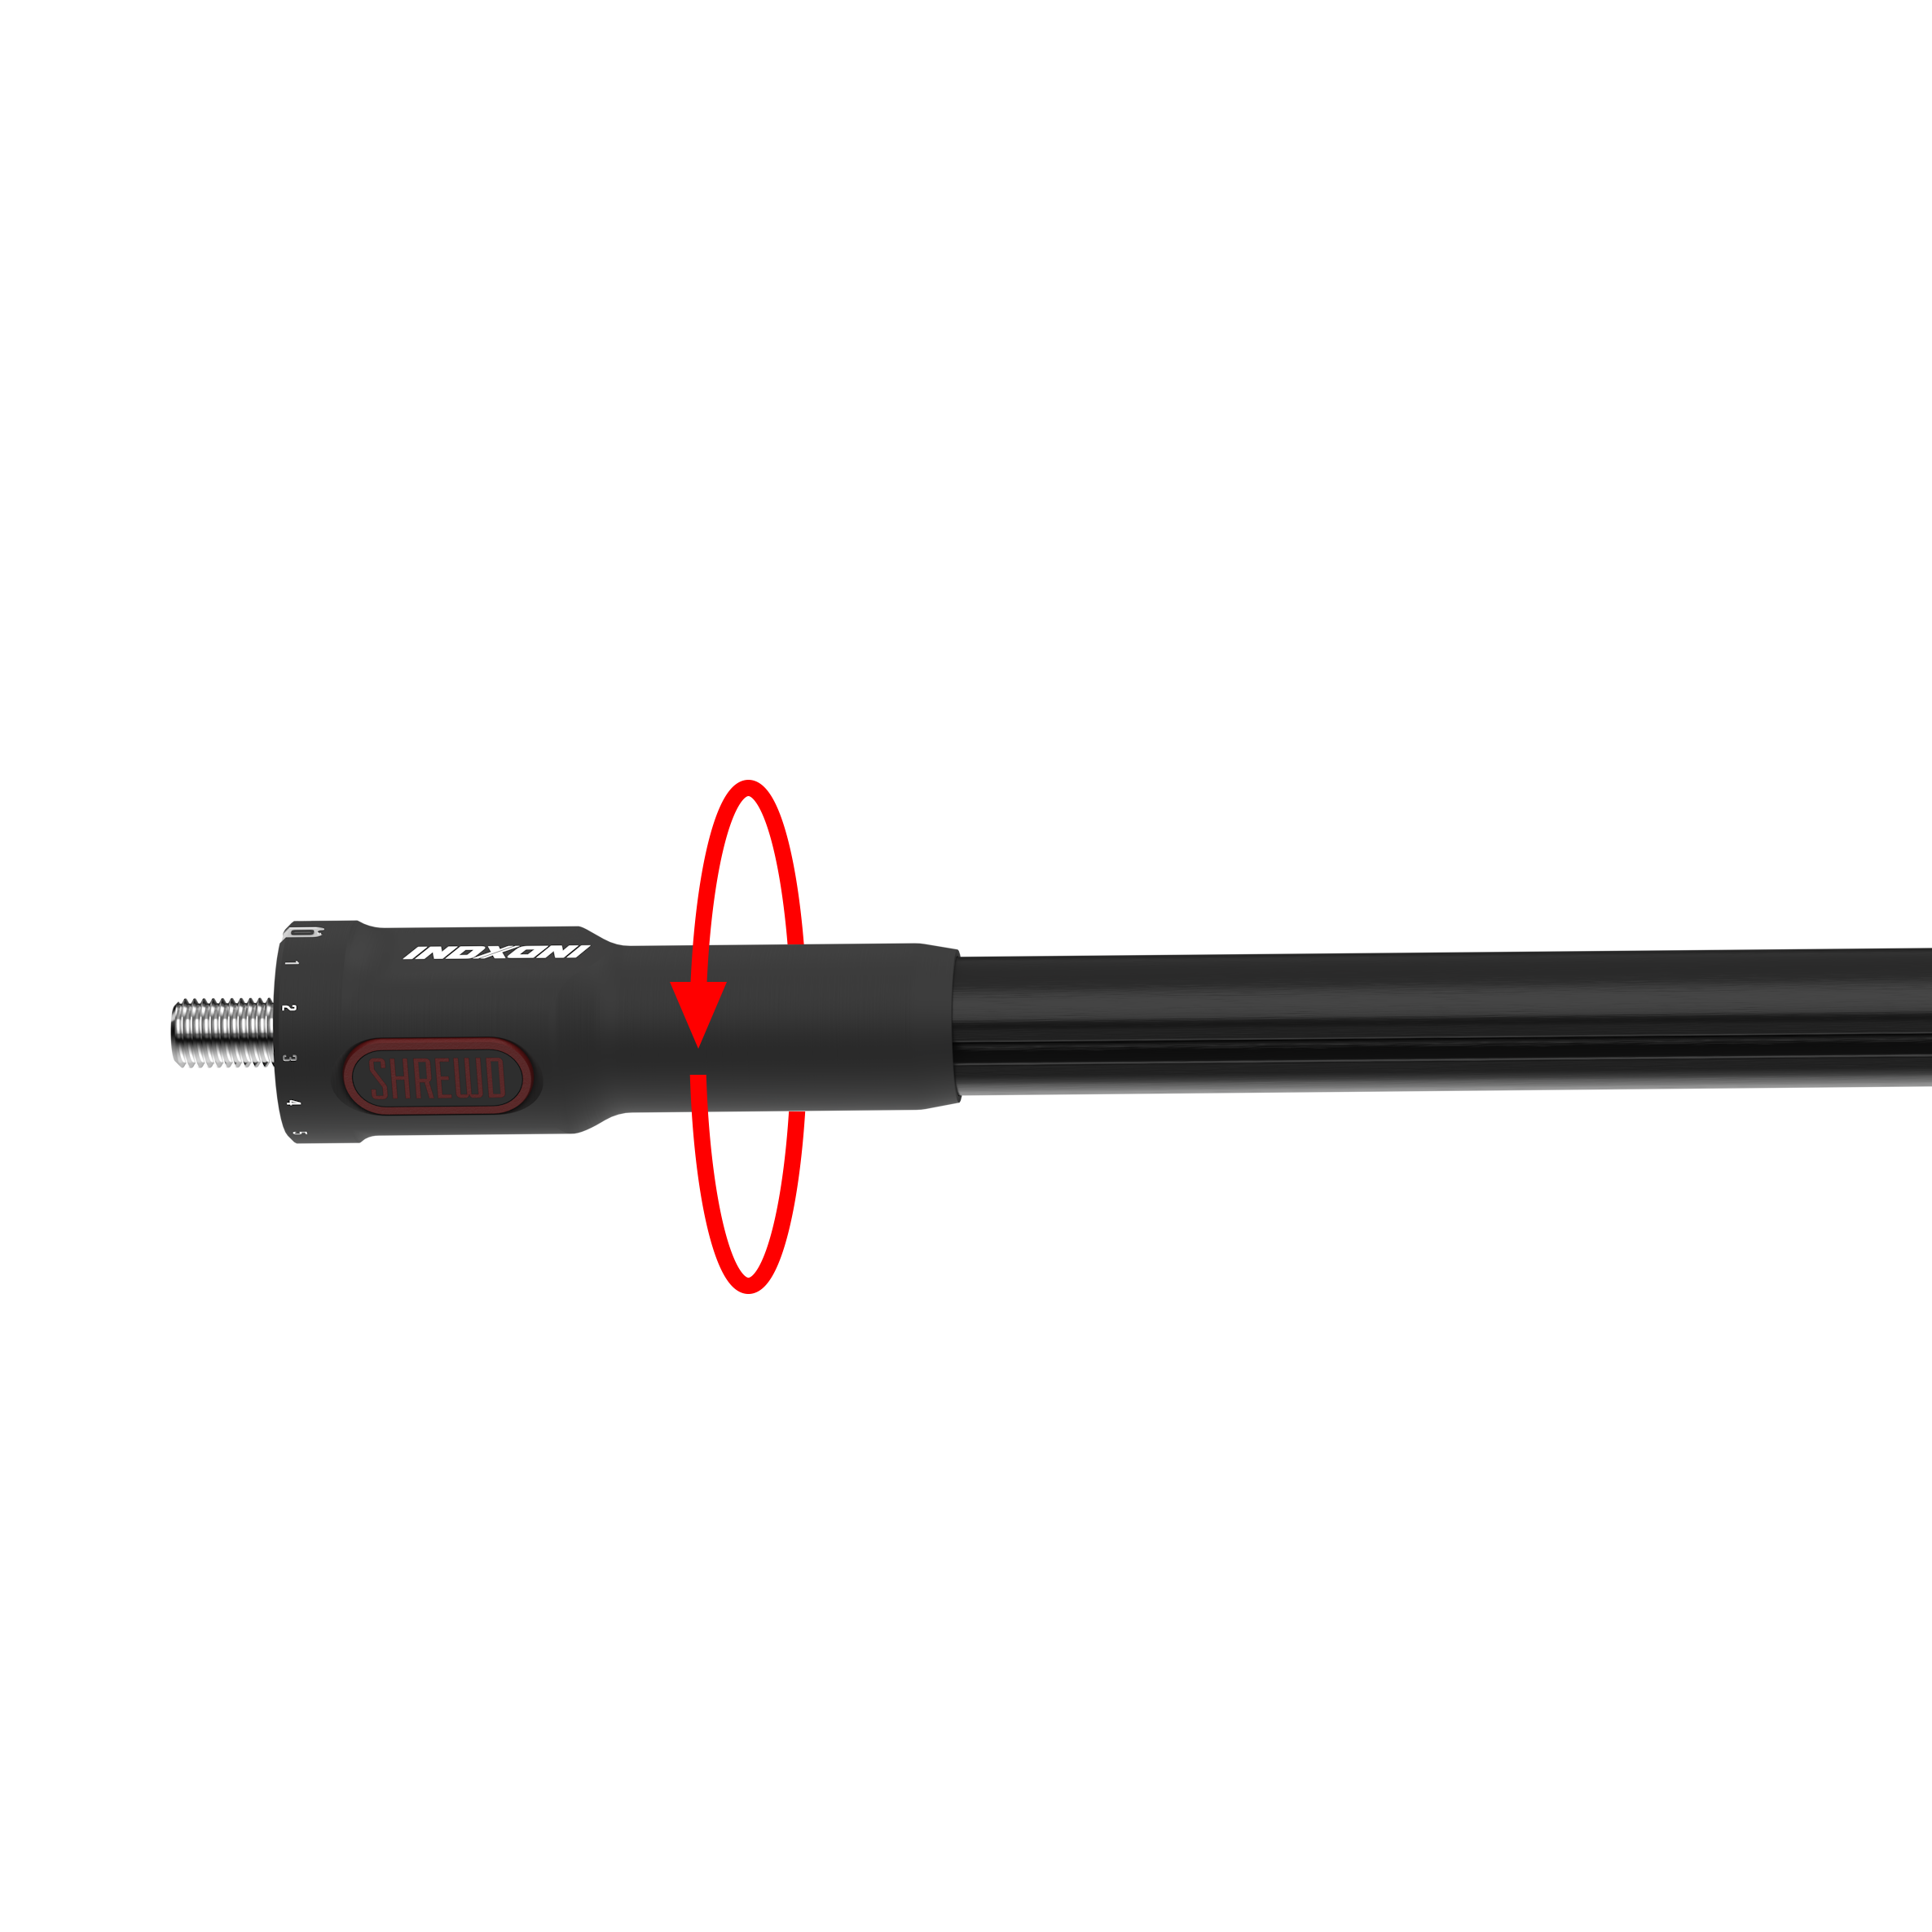
Indexable
The index bolt system enables the archer to quickly and easily set the orientation of the stabilizer.
Step by step guide to
Setting your INDX Stabilizer
Your INDX stabilizer can be set in variety of positions, in this guide we will walk you through how to orient your stabilizer in the two most common settings, rigid and dynamic.
Rigid Orientation
The rigid orientation sets the grooves on the sides and provides maximum stiffness and strength.
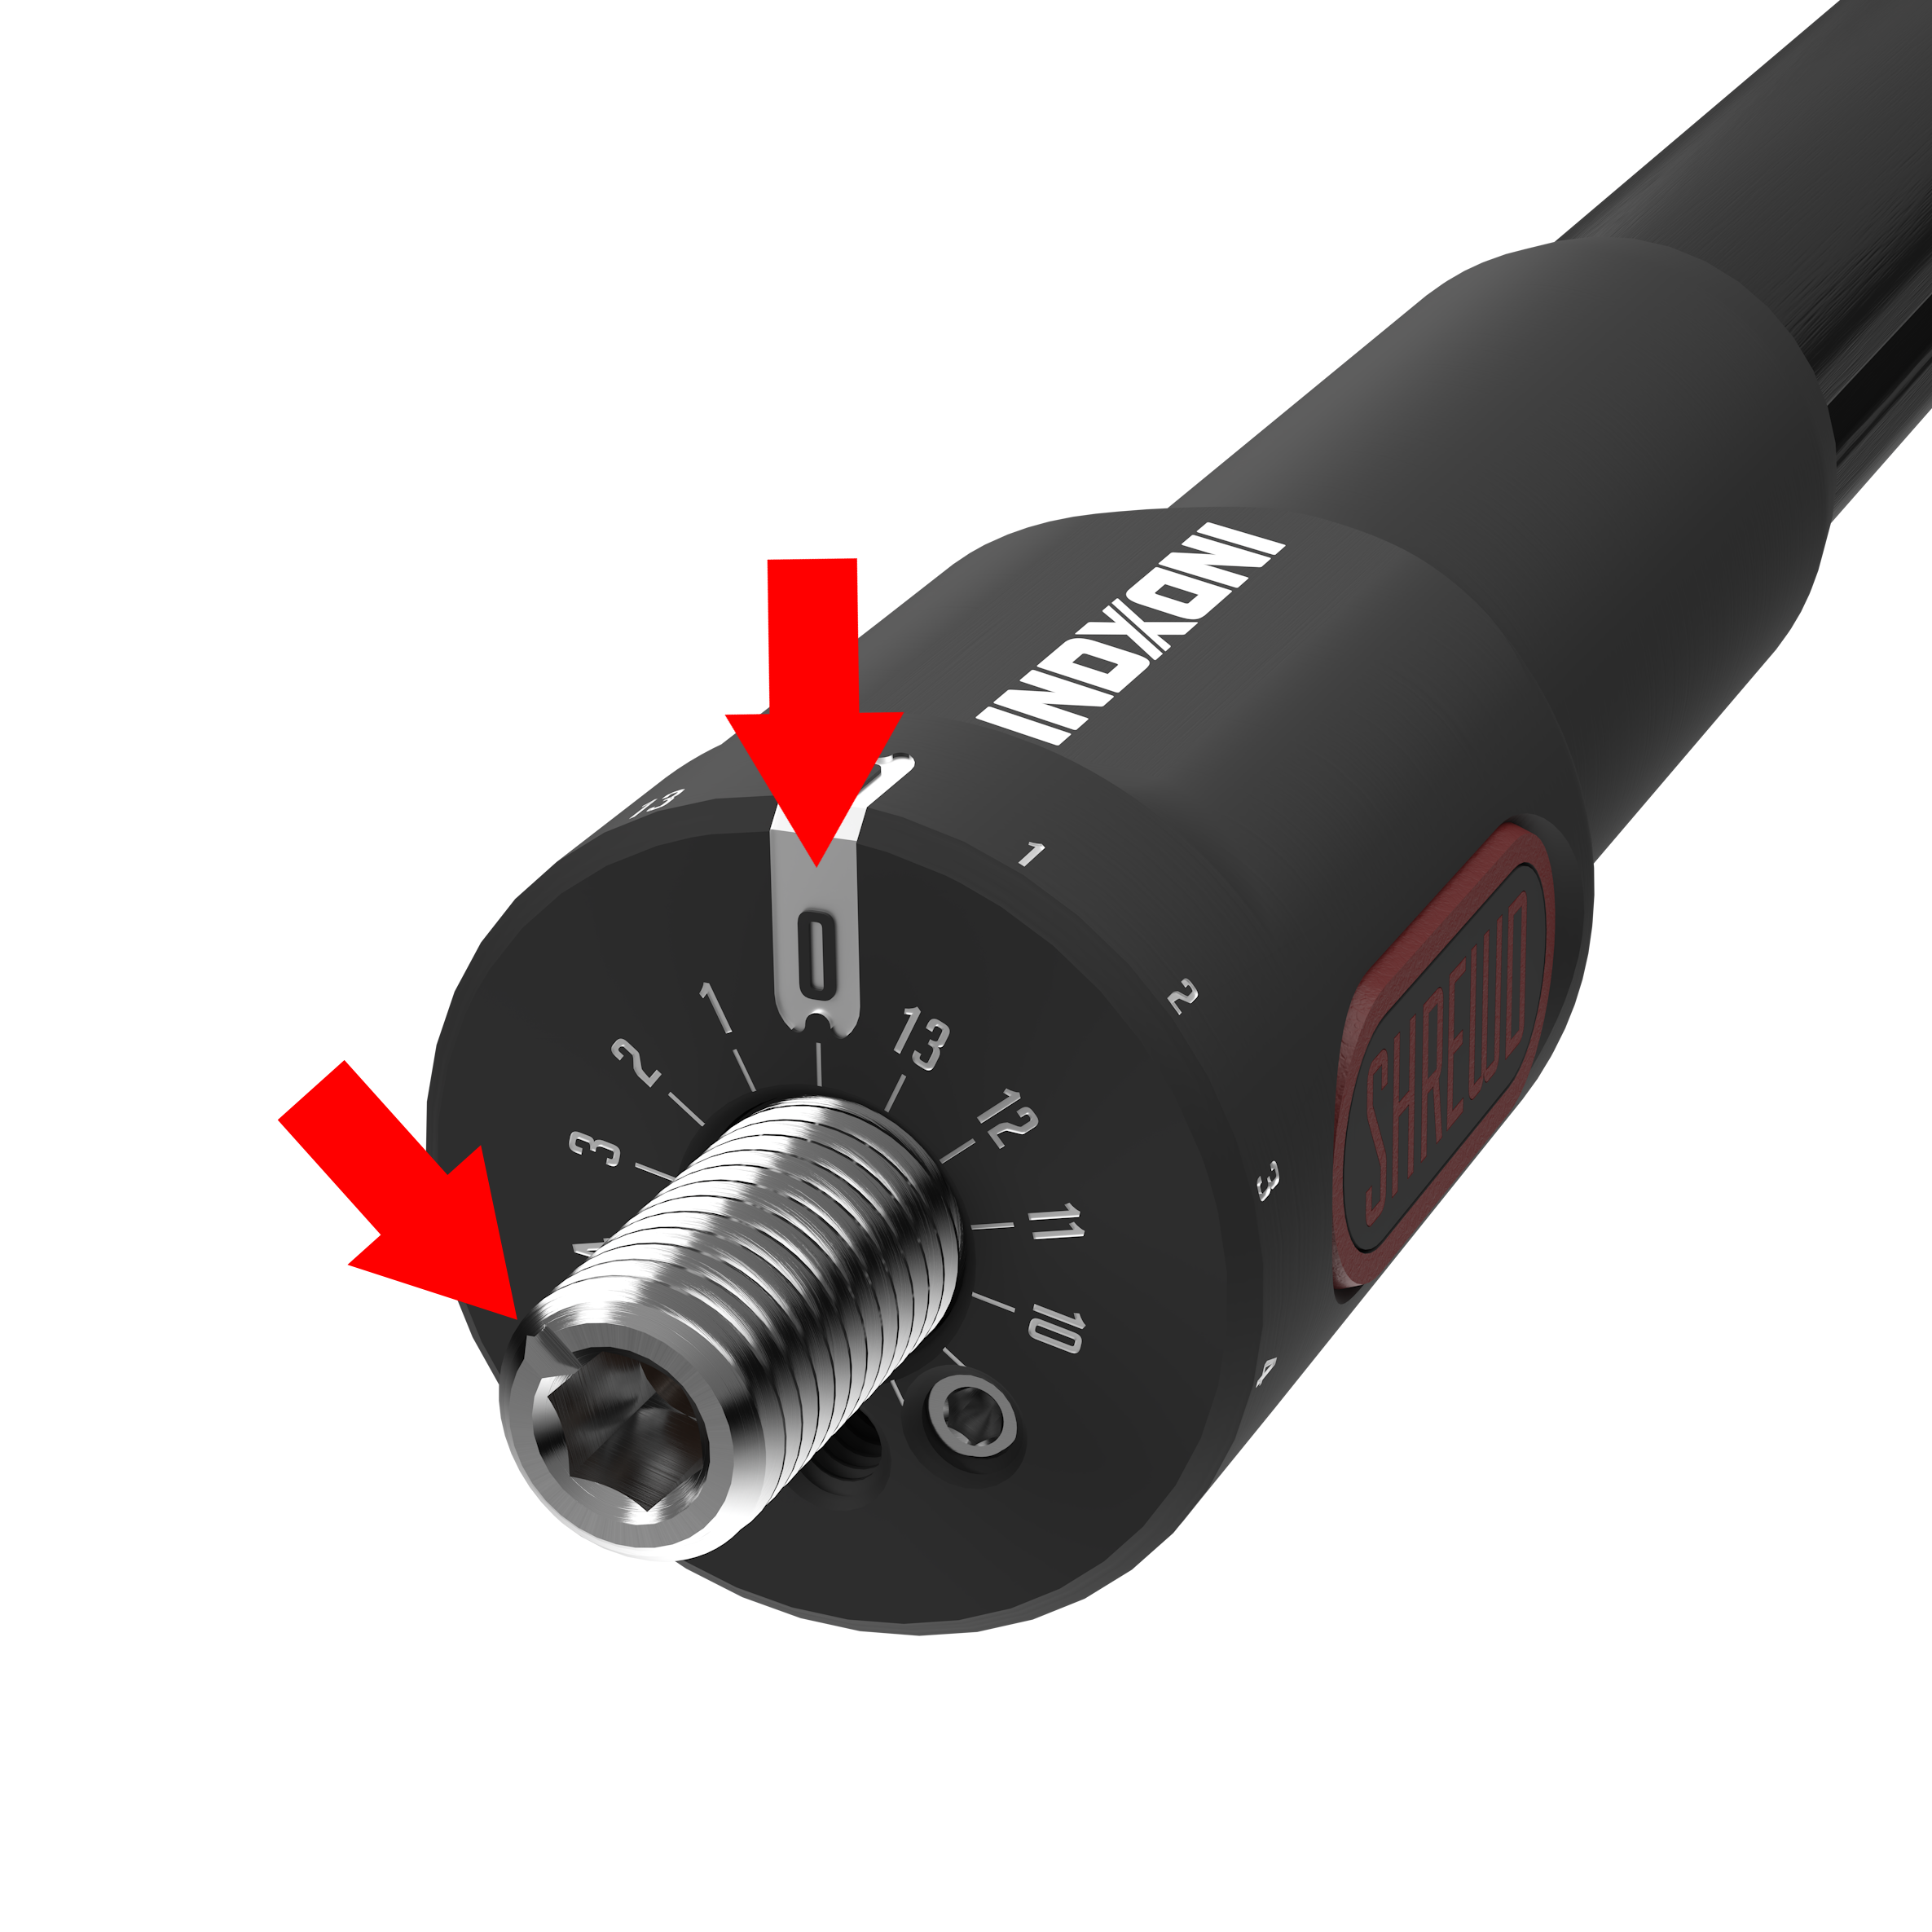
STEP 1
Set Indexing Bolt to Zero
Ensure the notch on the indexing bolt is set to zero (factory default).

STEP 2
Thread Stabilizer
Screw the stabilizer into the desired mounting location. This can be directly into the riser, on a quick disconnect, or a v-bar.
Be sure to tighten down the stabilizer just as if you were going to go shoot.
*If a barrel nut is used for a quick disconnect or v-bar the stabilizer will need to thread into the same side of the barrel nut.
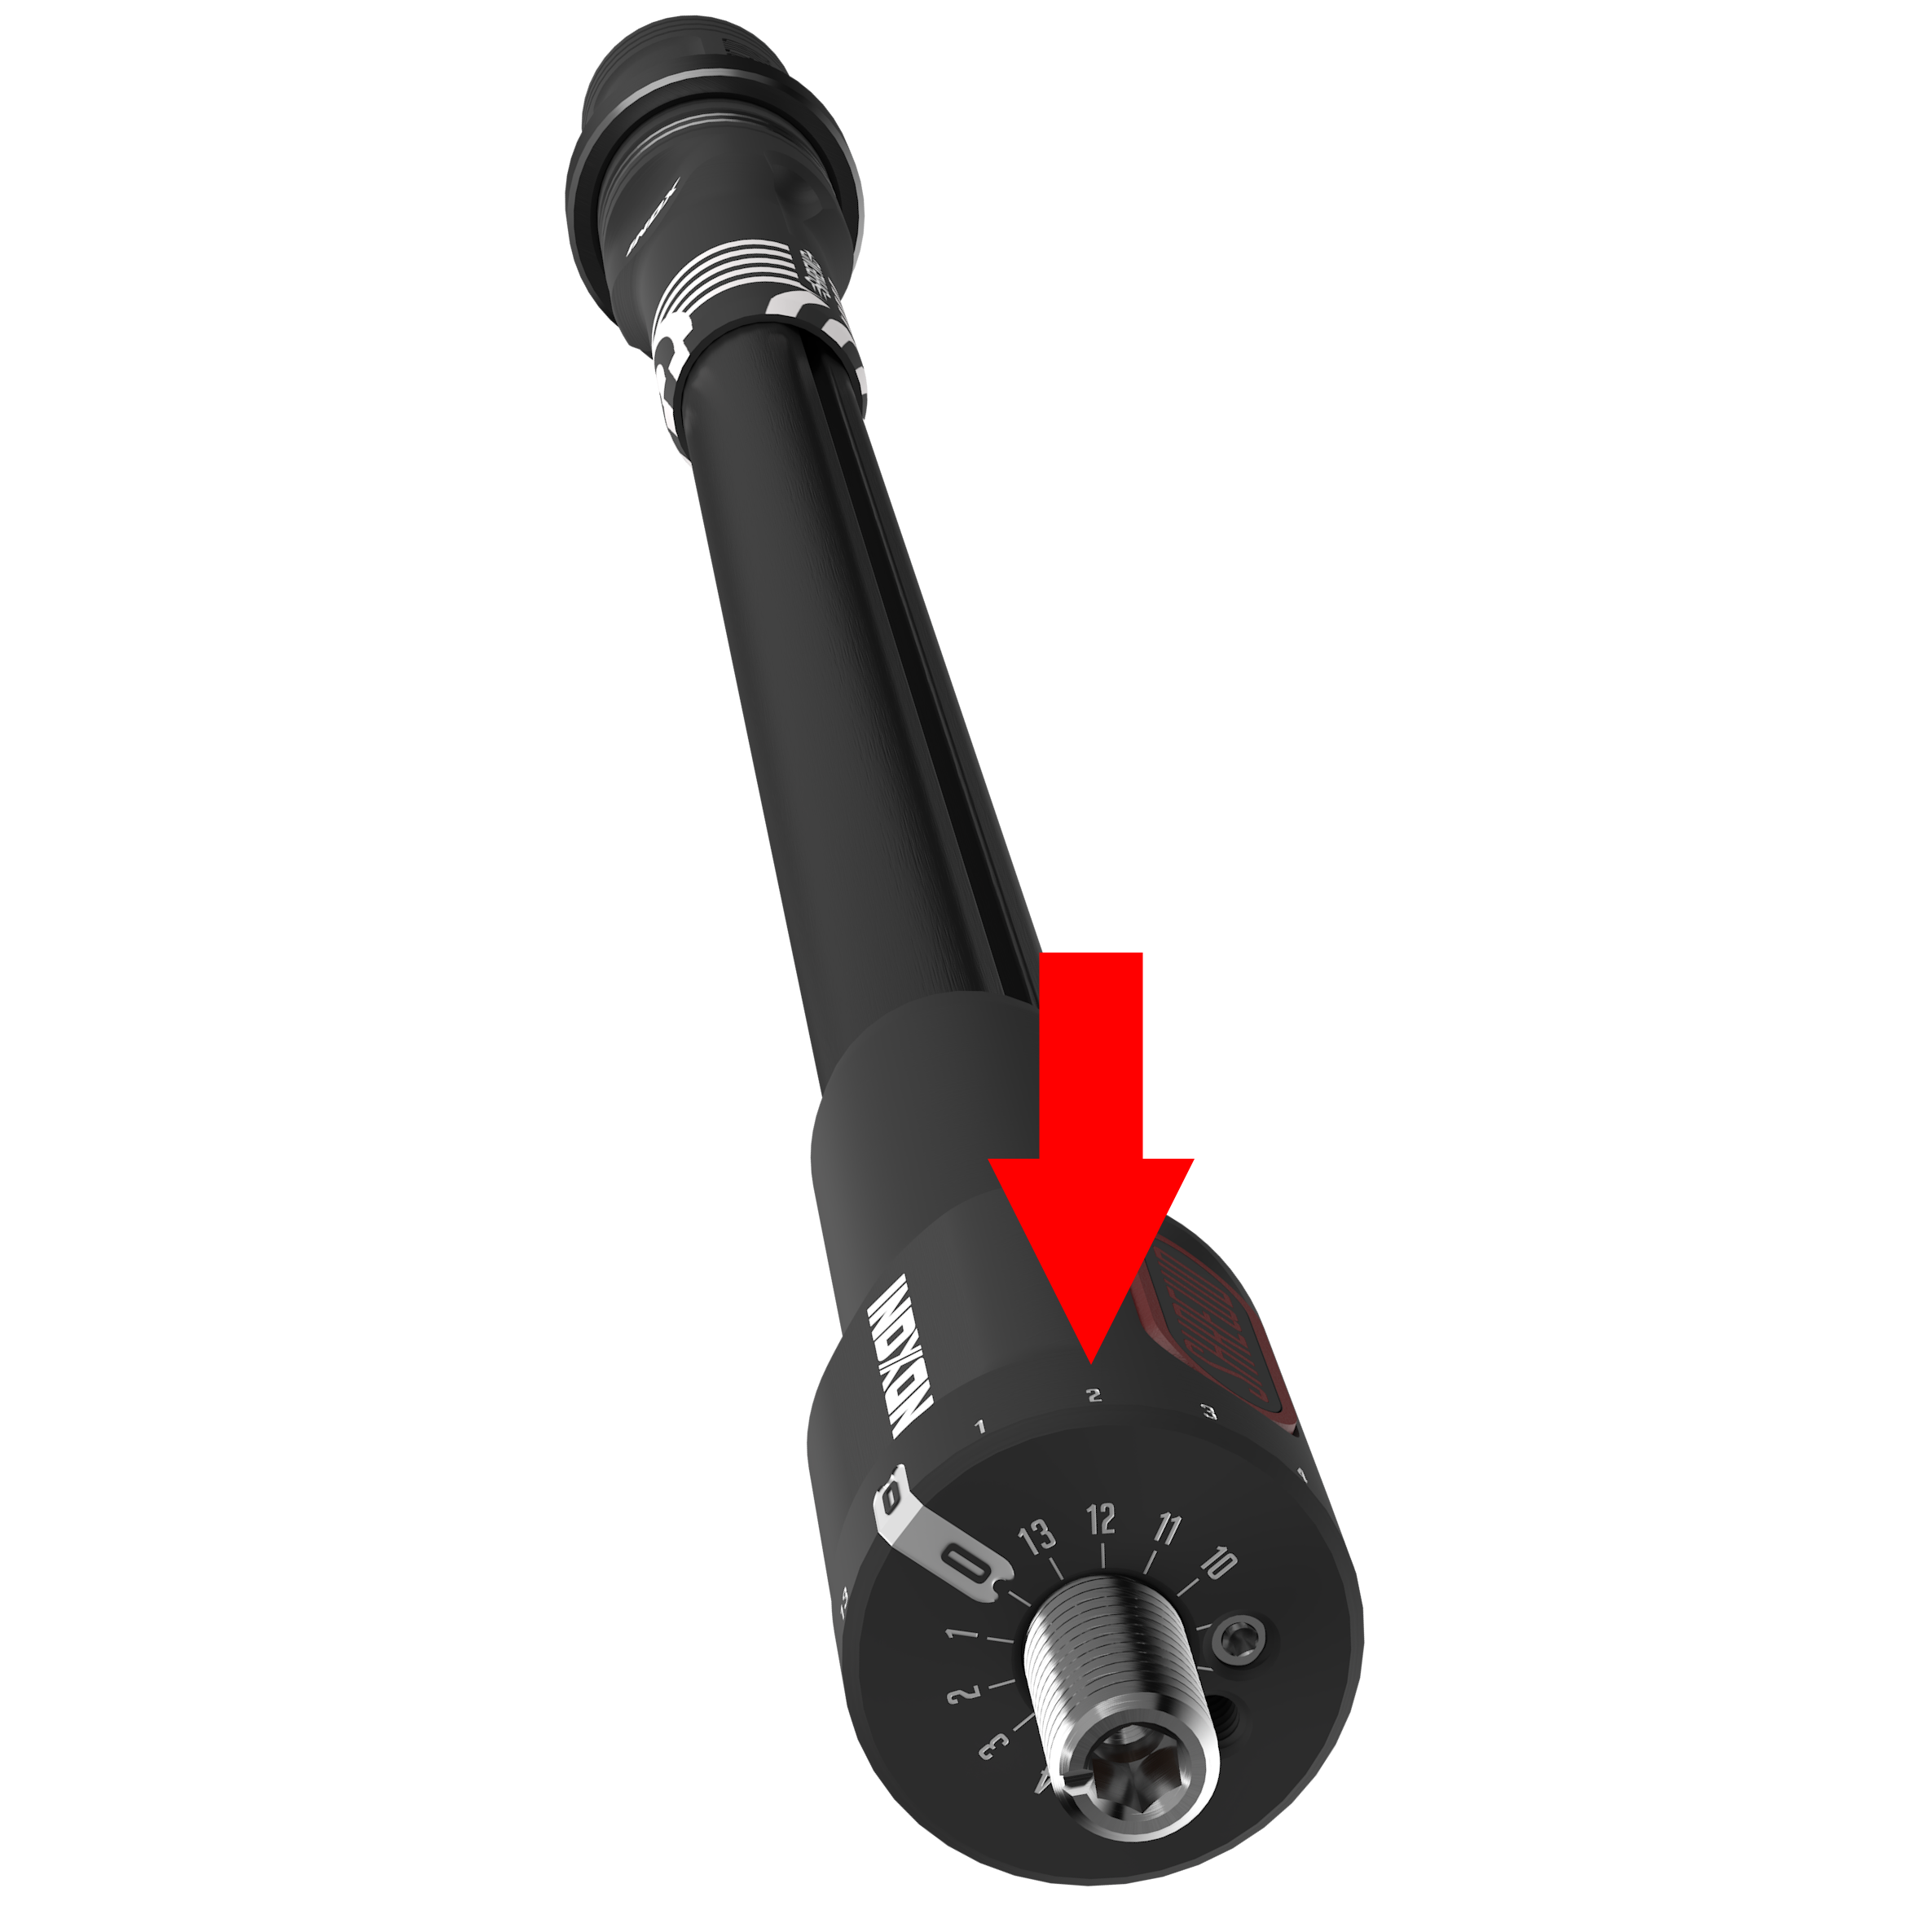
STEP 3
Note Position
After threading the stabilizer on, identify the number at the topmost position. If between two numbers, note the half position (e.g., 5.5 if between 5 and 6).
In this example you can see 2 is the topmost number. Remember your number for step 5.
STEP 4
Remove Stabilizer
Unscrew the stabilizer and remove the barrel nut, if used.
If a barrel nut is used (the small threaded piece inserted into a quick disconnect or v-bar) you will need to thread the stabilizer back into the same side of it after adjusting the index bolt.
STEP 5
Adjust Indexing Bolt
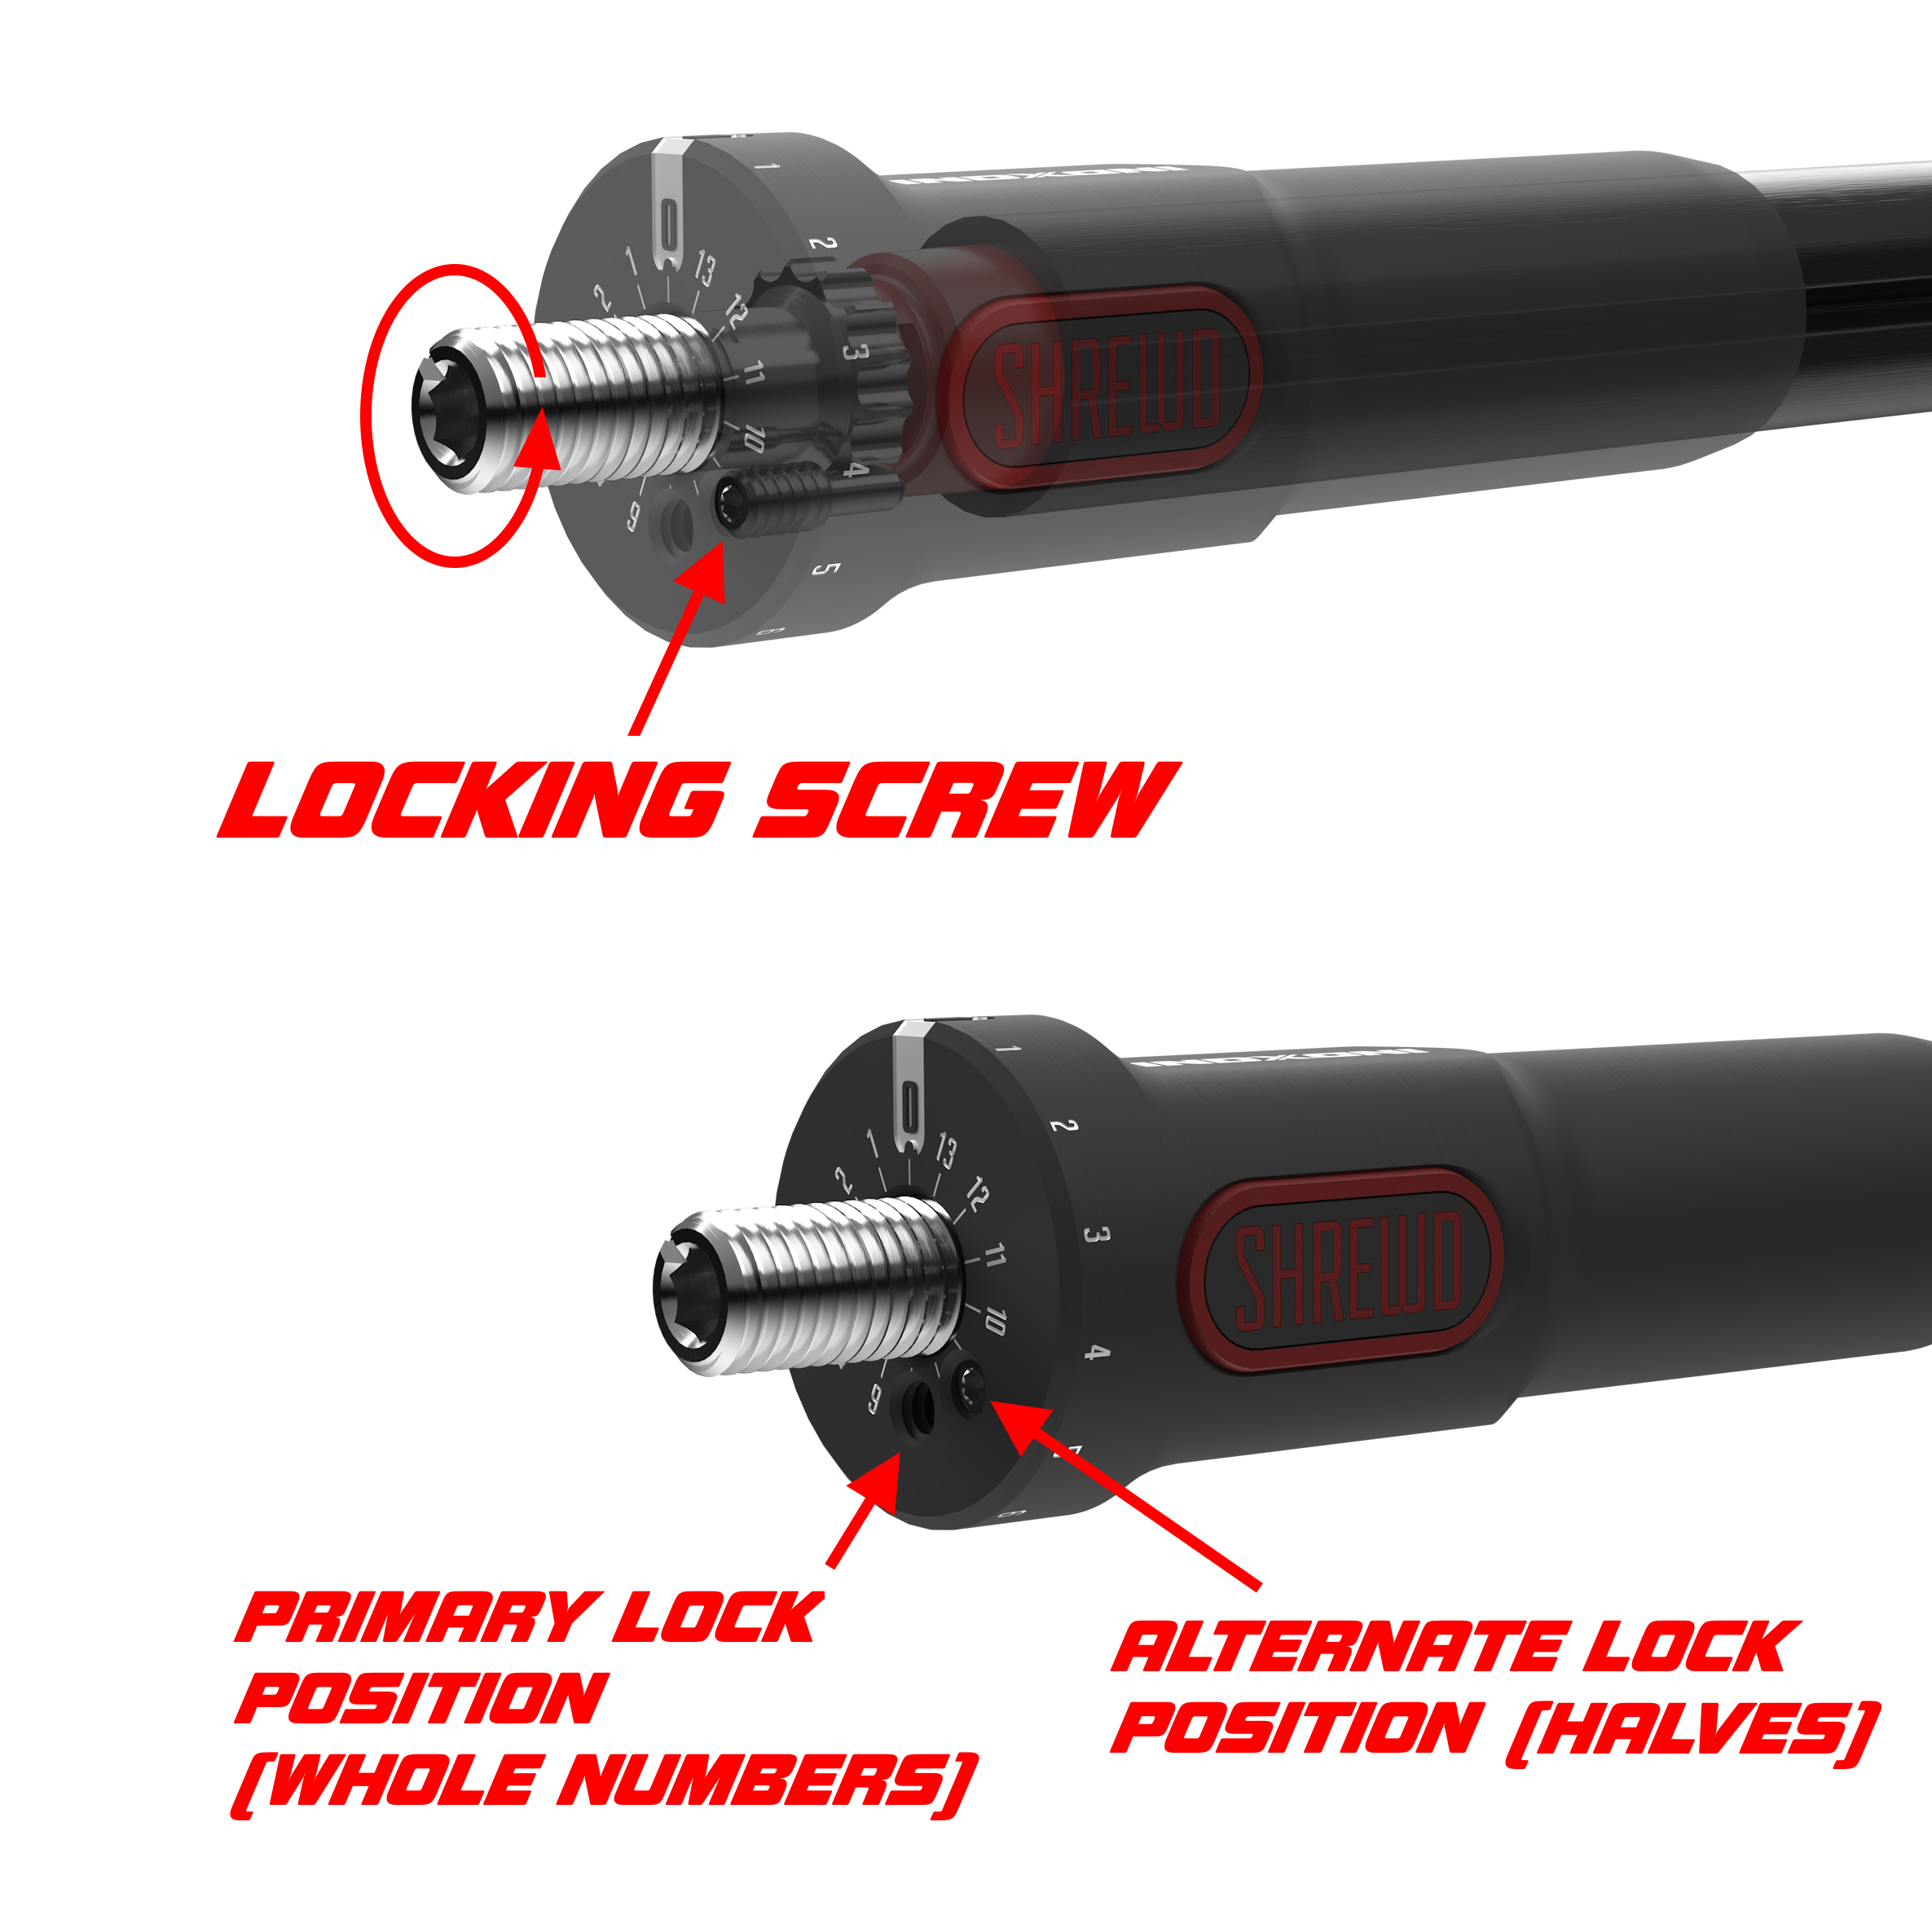
Loosen (but do not remove) the locking set screw.
Rotate the indexing bolt to match the noted number.
For half positions, move the locking set screw to the alternate index lock hole.
Example 1: If the top position was 4, set the indexing bolt to 4.
Example 2: If the top position was 6.5, set the bolt to 6.5 by moving the locking screw to the alternate hole.

STEP 6
Tighten Set Screw
Snugly tighten the locking set screw (do not overtighten). The indexing bolt may feel loose but will be secure when mounted.
It is normal to hear a rattling sound from the mounting bolt when the stabilizer is not threaded into the bow.
STEP 7
Reattach Stabilizer
Thread the stabilizer back into the mounting location; it should align with "0" at the topmost position.
Dynamic Orientation
The dynamic orientation sets the grooves of the carbon on the top and bottom and offers maximum dampening and a softer feel.
STEP 1
Set Indexing Bolt to Zero
Ensure the notch on the indexing bolt is set to zero (factory default).
STEP 2
Thread Stabilizer
Screw the stabilizer into the desired mounting location. This can be directly into the riser, on a quick disconnect, or a v-bar.
Be sure to tighten down the stabilizer just as if you were going to go shoot.
*If a barrel nut is used for a quick disconnect or v-bar the stabilizer will need to thread into the same side of the barrel nut.
STEP 3
Note Position and add 3.5
After threading the stabilizer on, identify the number at the topmost position. Add 3.5 to the topmost number.
If between two numbers, note the half position (e.g., 5.5 if between 5 and 6).
In this example you can see 2 is the topmost number so you will add 3.5 and your new number will be 5.5. Remember your number for step 5.
If your new number exceeds 13.5 (the highest number on the end scale) you can instead subtract 3.5 from your original noted number.
STEP 4
Remove Stabilizer
Unscrew the stabilizer and remove the barrel nut, if used.
If a barrel nut is used (the small threaded piece inserted into a quick disconnect or v-bar) you will need to thread the stabilizer back into the same side of it after adjusting the index bolt.
STEP 5
Adjust Indexing Bolt
Loosen (but do not remove) the locking set screw.
Rotate the indexing bolt to match the noted number from step 3.
For half positions, move the locking set screw to the alternate index lock hole (found at position 9 on the end scale)
Example 1: If the top position was 4, set the indexing bolt to 7.5.
Example 2: If the top position was 6.5, set the bolt to 10 by moving the locking screw to the alternate hole.
STEP 6
Tighten Set Screw
Snugly tighten the locking set screw (do not overtighten). The indexing bolt may feel loose but will be secure when mounted.
It is normal to hear a rattling sound from the mounting bolt when the stabilizer is not threaded into the bow.
STEP 7
Reattach Stabilizer
Thread the stabilizer back into the mounting location; it should align with the grooves on the top and bottom of the stabilizer.
INDX STABILIZER
Common Questions
Find the answer to commonly asked questions here. If you can't find the information you need please reach out to us and we will be happy to help!
Contact UsIs it difficult to set up the INDX stabilizer?
The INDX system is designed to be intuitive and user friendly. After following the instructions above for your initial setup you will find it easy to adjust the bars to any bow or position.
Will I need to adjust the position frequently?
Once you set your INDX and are happy with the orientation you will not need to adjust it every time you take it on or off your bow.
If you change mounting locations you will most likely have to go through the setup process again. Fortunately it's quick and easy to do so!
What setting should I use?
No two bows are the same so we recommend trying both rigid and dynamic and see which works best for you. Rigid will typically be best for those running 8 or more ounces out front or for anyone who wants a more rigid feel. Dynamic will soak up more vibration but with increased movement and a softer feel.
Can I use any weights with the INDX?
The INDX system uses 5/16"-24 threads and will accept any weights with the same thread size.
Every INDX comes standard with (2) 1oz threaded tungsten weights and a 3" threaded rod in addition to the Mass Damper.
Is it normal for my INDX stabilizer to rattle when it's not on my bow?
Yes, a rattle from the mounting stud is normal when the stabilizer isn't mounted but this will go away as soon as you thread it into the bow. The rattle comes from the free-floating nature of the index bolt system.
Do I need to worry about the adjustment bolt coming loose?
We have gone to every effort to make a bullet proof system that mechanically locks in place and creates an interference fit. The locking screw fits between teeth of the mounting stud to prevent and movement and once the stabilizer is threaded onto a bow it isn't possible for the locking screw to back out.
What if I lose my locking screw?
Every INDX stabilizer has a spare locking screw stashed away in the mounting stud of the stabilizer just in case. Two is one and one is none.